I was getting frustrated with Notepad++ as every I would go to File and Open it would open some random localization type directory and I would have to navigate out to my documents or desktop. I found it’s a very obvious setting to adjust I just had never taken the time to look for it.
Click Settings – top menu
Select Preferences…
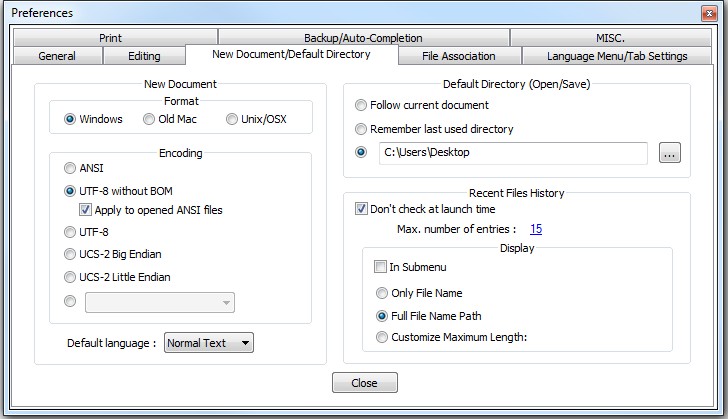
Select Tab – New Document/Default Directory
Go to top right section – Default Directory (Open/Save)
Select on of the options that suits you best – I chose to designate a path to C:\Users\Desktop
Definitely simple and frustrated I didn’t look for it sooner. Here is a screen of the preferences box in Notepad++
Changing Notepad Default Directory
This simple run in today just reminds me that almost all programs have a setting for what is annoying you, so you don’t have to put up with most nuances. Take a moment and fix what is bugging you.
I find this to be a terribly obscure way to do a type conversion. The double exclamation mark in JavaScript basically means convert to Boolean, invert, then invert again. I documented this on my blog for quick reference as I keep running into it.
So you’re converting a value to a boolean, then inverting it, then inverting it again. Take a look at the three examples below that mean the same thing starting with the double exclamation mark.
// Really Confusing:
site.enable = !!webId;

// Less Confusing:
site.enable = (webId != 0) ? true : false;

// Easiest to understand in my opinion:
site.enable = (webId != 0);
Here are transition steps for a solution from TFS over to GitHub using Git Extensions. We will establish a repository on GitHub and create a feature branch.
Step 1. Establish repo in Github
On the homepage of your GitHub account, there is a green but that says ‘New Repository’; Click it.
Change the Owner to Your Account
Enter your Repository Name.
Select Private/Public (Your Preference)
Add .gitignore for CSharp (Pick applicable language. This keeps git from version-ing unnecessary files)
Step 2. Establish master code branch (contains current production code)
Create a Directory at C:\Git
Right-Click on C:\Git and GitEx Clone
Repository to Clone: https://github.com/YourAccount/RepositoryName.git (GitHub given location)
Destination C:\Git
Everything else blank.
(May be prompted for credentials: These are the credentials you log in to github.com with)
Copy Source code from your TFS location or wherever into C:\Git
May take awhile depending how big code solution is
Right-Click on C:\Git
GitEx Commit
Stage All (May take awhile)
Add a comment then ‘Commit & push’
Will do intial commit, (click ok) then bring up push dialog, and wait again… for a while…then Ok.
Now you should be able to look on the GitHub site and see all the files you just pushed.
Step 3. Establish Feature Crew branches
Create branch locally (Don’t need to check it out)
Right-Click on your local Repository (ex c:\Git)
Git Extensions
Enter Branch Name (ex: FeatureCrewBranch)
Deselect Checkout after create
Create Branch
Push FeatureCrewBranch to remote (Branch to push FeatureCrewBranch to FeatureCrewBranch)
Right-Click on your local Repository (ex c:\Git)
Git Extensions
Push
Remote origin (Master)
Branch to push FeatureCrewBranch to FeatureCrewBranch
Add tracking reference
4. Probably will want to compress Git database
Right Click on your local repository (ex. C:\Git)
Select Git GUI
Select compress the db now (Popped up a window for me..will take a bit)
If no pop up shows
Click Repository in top left
Compress Database
It’s not the hardest process, but it is kind of confusing. Please let me know if you have any ideas or clarifications that we can make.
I had the need come up in a project to split an address that gets inputted in a single line and has no validation. Apart from the obvious fix of requiring validation and saving the fields in different columns I had to come up with the best way to to split out that address so that we could wrap it in a rich snippet. This is a Regex I found, I cannot find it again..so if someone knows the original source/author please let me know so I can give the correct credit.
Since I am having such a hard time finding anything that is close to this I figured it necessitated a blog post to get the information out there.
//Splits Address formatted like this.. 1045 E Test Lane, Gilbert, AZ 85296
Regex splitAddressRegex =
new Regex(@"(?(^[^,]*,[^,]*,[\w\s]*$) # If check Condition for 2 commas if so match below
(?[^,]*)    # Place into capture group Line1
(?:,\s)     # Match but don't place into capture.
(?[^,]*)    # Place into capture group City
(?:,\s)     # Match but don't place into capture.
(?\w\w)     # Place into capture group State
(?:\s*)     # Ignore spaces
(?[\d\-]*)  # Place int Zip
(?:$|\r\n)  # Match/No group either $ or \n\r
|           # Else its a bigger address
(?[^,]*)    # Place into capture group Line1
(?:,\s)     # Match but don't place into capture.
(?[^,]*)    # Place into capture group Line1
(?:,\s)     # Match but don't place into capture.
(?[^,]*)    # Place into capture group City
(?:,\s)     # Match but don't place into capture.
(?\w\w)     # Place into capture group State
(?:\s*)     # Ignore spaces
(?[\d\-]*)  # Place int Zip
(?:$|\r\n)  # Match/No group either $ or \n\r
)", RegexOptions.IgnorePatternWhitespace);
It’s a pretty in-depth and ugly Regex but you end up with the address split into groups. So if you run the address: 1045 E Test Lane, Gilbert, AZ 85296
You end up with groups such as..
matchedAddress.Groups["Line1"].Value //1045 E Test Lane
The comments in the Regex snippet show you the group names. Again, I did not make this and would love to give credit but can’t find the original source and definitely want to have it published as it saved me a lot of time.
This is a very vast concept and way too much for one post so I will start off basic and add subsequent posts as I go deeper. The first step is to obviously install Git. At the time of writing this I am using Git 1.8.1.2. Since this lends itself to personal preference and team preference I will not cover the install.
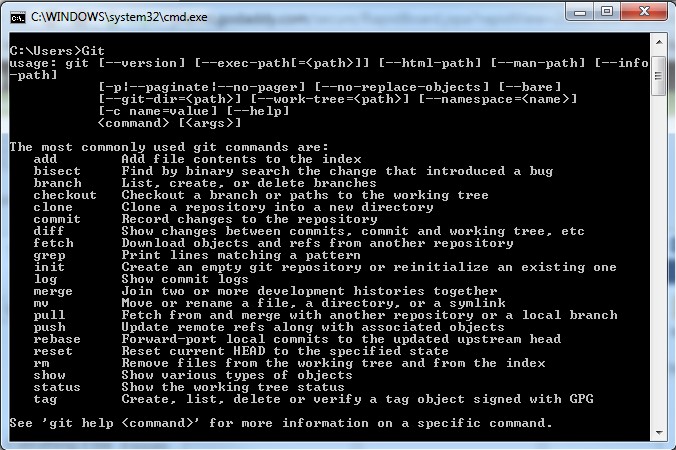
Once you have Git installed, let’s open a command prompt. The very first command I want you to run is simply: Git. This will ensure that you installed Git and we are ready to go. You should see a screen as such below.
If you see this output from your command line then you are set up and we are ready to get started. The next step we need to do is create a local folder that we will use as our Git Repository.
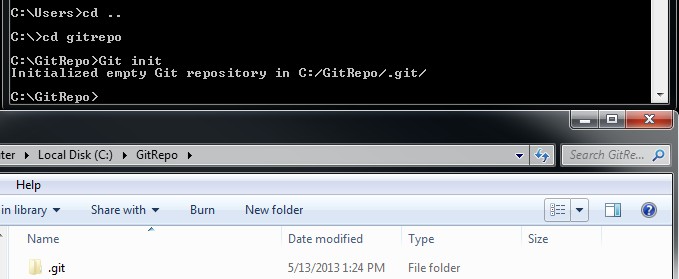
-Create a folder at C:\GitRepo
-Use your command line and change directories to new created directory.
-Run Git Command:  Git init
-Verify you have the results below.
The top being the command prompt and the bottom showing the folder you created and now a .git file. The .git file is a Git repository and will host all the files that we add and commit to it throughout this tutorial. The next thing we need to do is set some global config settings so that we have a username and email associated with our commits.
Now let’s make our first commit. In the directory we created C:\GitRepo lets create a text file and add a line of content to it. We will then add this to our repository and then commit it.
-Create text file name MyFirstCommit.txt
-Add some content to text file.
-Run Git Command: Git add MyFirstCommit.txt
At this point in time, our file is in what would be considered a staging area. It’s been adding to the repository but it has not been ‘checked in’ or ‘committed’ to the repository.
-Run Git Command: Git commit --m "This is my first commit."
This should be what your current state looks like.
The last piece we will cover in this blog post is seeing the history of what has happened. For this we will use the following command.


Recent Comments